
Hoy os explico como podéis hacer un bolso acolchado de boquilla.
Además de hacer este tutorial, he empezado una colección en Pinterest con patrones de bolsos .
La tela Big Blooms se encuentra aquí
La tela de foro con lunares se encuentra aquí
Today I will show you how I made this quilted bag.
The flowered fabric can be found here
The polka-dot fabric can be found here
Tutorial bolso de boquilla

What you will need for this bag:
- 1 clasp
- paper and marker
- scissors
- 40 cm of exterior fabric
- 40 cm of interior fabric
- batting
- gold thread
- interfacing if you are making the bag unquilted
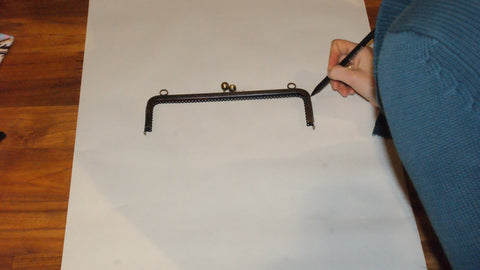
1. DISEÑAR EL PATRÓN
Primero, trazamos la boquilla en el papel, siguiendo el contorno de la misma boquilla.
First, trace the form of the clasp on the paper
Giramos la boquilla hacia fuera (+/- 2.5 cm) y trazamos junto al lado corto de la boquilla como está en las fotos de abajo. Además marcamos la posición de la bisagra.
Turn the clasp outward (+/- 2.5 cm) and trace the short side of the clasp. Don't forget to mark the position of the hinge.


En el otro lado de la boquilla hay que dibujar el inverso. A fin de que sea exactamente inverso, cortamos el patrón hasta la mitad, doblamos el papel a la mitad y copiamos la forma en el otro lado.
To copy the pattern on the other side, cut the pattern to the middle of the drawing, double it to the other side and trace around the cut out shape.


Diseñamos la forma que queremos dar a nuestro bolso, y como en el paso anterior, lo cortamos, doblamos y copiamos al otro lado.
Now draw the form you want for your bag, and like the previous step, cut out to the middle, fold in half and trace the outline.


The first piece of the pattern is now ready.

Ahora medimos la distancia desde el medio de la parte inferior (A) de nuestro bolso hasta la marca de la bisagra (B). Luego dibujamos en otro papel un rectángulo de esta longitud (A-B) y una anchura de 8 cm. (o 10 cm si quieres un bolso más ancho)
To make the inset, measure the distance between point A (middle of the bottom of the bag) to point B (marking of the hinge) and draw a rectangle with one side measuring this length A-B. The width of the rectangle should be between 8 and 10 cm, depending on how roomy you want your bag to be.

En el rectángulo redondeamos un lado corto hacia dentro. La segunda parte de nuestro patrón está.
Round one of the widths of the rectangle inwards.

El patrón final:
We have finished our pattern.

Ahora cortamos nuestra tela.
2 piezas del patrón básico del bolso para cada capa (2 x exterior, 2 x interior y 2 x entretela/guata/polar)
1 pieza del rectángulo redondeado, utilizado en doble (1 x exterior, 1 x interior y 1 x entretela/guata/polar) Para usar esta patrón en doble, plega la tela a la mitad y coloca el patrón sobre la doble capa de tela con el lado corto recto en el pliegue.
Now we cut our fabric:
2 pieces of every fabric of the basic pattern (2x exterior, 2x interior and 2x batting/interfacing)
1 piece of every fabric of the rectangle, placed on the fold of the fabric (1x exterior, 1x interior and 1x interfacing/batting)
Y ahora: A COSER!
And now: we sew!
1. ACOLCHAR
Acolchar es muy fácil! Simplemente superpones la tela exterior a la guata (o polar) y coses el dibujo que tú quieres. Para mi bolso hice un dibujo de cuadratitos con diagonales. Primero hay que dibujar con rotulador directamente en la guata o con tiza de sastre en la tela exterior. Luego, coser las dos capas superpuestas, siguendo el dibujo que has trazado.
1. QUILTING
Quilting is not that hard! Just pin the exterior fabric together with the batting and sew the pattern you want. I made a pattern of diagonal squares. First you draw the pattern with a marker on the batting or with tailors' chalc on the exterior fabric, and then you sew the two layers together. Depending on which side you drew the pattern, you put the gold thread through the needle or on the bobbin.

Si no quieres acolchar tu bolso, simplemente aplicas la entretela a la tela exterior y sigues con la construcción.
If you don't want to quilt your bag, just apply the interfacing to the wrong side of the exterior fabric and continue the construction.
2. CONSTRUCCIÓN
Empezamos con el forro del bolso que es la parte interior:
Alinea el medio de la pieza básica con el medio de la pieza rectángular, moldeando la tela en las curvas y cose. Repite con la otra pieza básica. El forro del bolso ya está listo.
2. CONSTRUCTION
Let's start with the lining. Line the centre of the bottom of the bag up with the centre of the rectangle, right sides together. Ease in the rounded corners and sew together. Repeat with the other bag piece.
The lining is ready!


Construye el exterior del bolso de la misma manera que el forro.
In exactly the same way, assemble the exterior of the bag.
Una vez cosido el interior y el exterior del bolso, unimos esas dos partes.
Metemos el exterior dentro del forro, con los lados derechos juntos.
When both pieces are sewn, put the exterior bag inside the lining, right sides facing each other.

Ahora juntamos estas dos piezas, cosiendo a lo largo de los bordes
de la boca del bolso, dejando un hueco sin coser de +/- 5 cm para luego
poder volver del revés al bolso.
Una vez vuelto del revés, cerramos el hueco, cosiendo a mano.
We now put the two bags together by sewing the upper edges of the bag all the way around, leaving about 5 cm open, to turn the bag right side out.
When the bag is right side out, sew the gap closed by hand.

Para acabar el bolso, juntamos la boquilla y los bordes de la boca
del bolso, usando pegamento para textil o cosiendo a mano con un
pespunte, según el tipo de boquilla. La boquilla mía tenía agujeritos
para que pudiera pasar una aguja. Así que yo usaba hilo de bordado para
unir el bolso y la boquilla.
To finish the bag, we have to attach the bag to the clasp. Depending on the type of clasp, you either glue them together, or you sew them by hand using a backstitch. I used an embroidery thread to sew the pieces together.
Bolso listo!
Bag is ready!
Que chulo!!!!, tengo la boquilla hace tiempo y no me decidía a hacerlo, ahora me has animado, en cuanto tengo un hueco lo hago. Besos
ResponderEliminar